Hello there. I've now moved to a brand spanking new site Tailor Made Toys. *Clicky click*
All of the articles here and new ones updated regularly are over on the new site. See you there.
Sunday, 4 April 2010
Thursday, 4 March 2010
VU Meters and psp's
I love vu meters. I mean it I really really like them. So with me doing so much work on psp's over the years I knew that I would one day end up trying to fit one in a psp some how. I should say before I start that this is only a semi finished project. My psp (the one I use for gaming) has a full vu meter installed, however I have plans to do an entirely new revision of this, which I will go into more detail about later.
For those of you not in the know a VU meter displays signal level in Visual Units. They are often seen in audio equipment an are usually ether a needle or led display. Heres one here look . . .

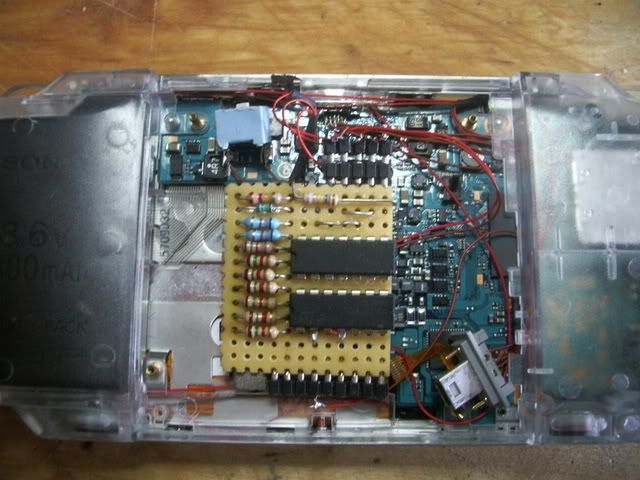
There are two ways that I know of of building a vu circuit. One is with a ic that is designed for it called a LM3915. This is relatively simple to use and would be perfect for what I want to achieve. I didnt have one of those though. The other way is using several opamps. I had some of those. So the design I went for in this first revision was 2 quad opamps called LM324's Heres an schematic of that circuit. Please note that this is not the actual one I used as I had to modify that for use with the psp. I do have that schematic but its currently residing in my desk tops HD in storage. I'll update this when I get set up back in the UK.

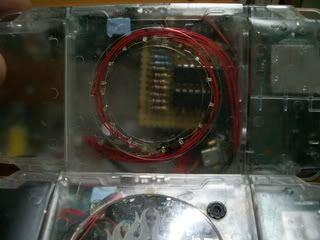
So after a little research and some trial and error on a bread board I built a circuit on a bit of proto board that fited nicely into the somewhat redundant umd drive space of my psp. Heres an image of how that looks.
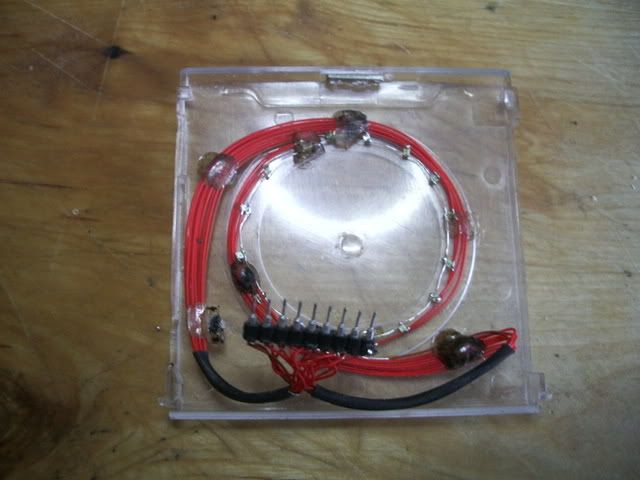
I then added 16 smt leds to the umd door. This was hooked up to the circuit using pin headers as a makeshift plug. I also used this method for hooking up the power ground and audio lines from the psp. Heres an image of the door led set up.
This dose work very nicely but I would prefer to do this in a more elegant way. For the next revision of this mod I intend to go fully smt using a smt LM3915 and an etched circuit board. Using this method I should easily be able to fit the pcb into another area of the psp should I want to use the umd drive. I may also add a picaxe to handle changing modes and colours.Stay posted for an update once that has been finished. I will then be offering that mod through my pro modding service :)
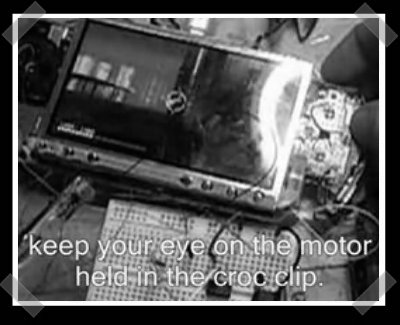
Ive had a request for a video of my psp in action so here it is. . . .
Sunday, 21 February 2010
XBOX 360 Controller Modding
This is my own xbox 360 controller. A you can see from the pics its very different from the standard design.
The ideas behind this evolved over time. I had seen modification where modders had put two buttons under the controller so that they could use they're index fingers for some of the buttons. This helps a gamer as it means they dont need to take there thumbs away from a stick to press them, very useful. I tried out the mod myself and found it honestly did help. After a while i became frustrated that I would still occasionally have to use one of the original abxy buttons. So I started to think about moving two more to the underside.

Once this was done I then realised that the right stick was not in the most natural place. Moving it in line with the left seemed like the next logical step. So with the help of some filler and a dremil I modded the controller into the configuration seen in the final design.

For some people when they see this the reaction is that it would be uncomfortable or confusing to use, but the truth is quite the opposite.
I wonder if this design was ever considered by microsoft or any controller manufacturer. Its seems odd to me that controller design is focused on using no more than 2 thumbs and a max of 4 fingers. From my experiments using different designs I can say that certainly for myself I am easily able to use all of my fingers and thumbs. Its a lot more natural feeling and means that I can react much quicker than before. I also wonder what advantage this would give a real pro gammer.
I do think there is a market for tailor made controllers. With each one being the exact specs that most compliment the gaming style of the user.
I would estimate it took me a day or so of gaming to become used to the new lay out and for my gaming to start to improve.
Judging from the feed back I have had from my original post about this and the subsequent video (seen at the end of this post) there is a large market out there of people wanting to be able to purchase a controller like this.
This project has been featured on several sites including boingboing, distructoid, and gizmodo.
I am now wondering what the future may hold for this mod. I am beginning to formulate ideas about starting a small business with controller modding as the flagship product. I'd love to get some feed back on this idea.
Saturday, 20 February 2010
Building The SG19
Well after a huge amount of pressure (2 people asked me). I am writing up a little how too on building a SG19 (sausage gun 19mm).
The basic principle of the cannon is using an electric spark to ignite a mixture of gas an air. In this case the gas is the propellent used to push hair spray out of a can. This is sprayed into the rear of the gun where it mixes with oxogen and is then ignited by the spark from a modded cooker lighter.
Ok so thats basically how it works. Heres how we made it.
Parts used where 19mm plastic plumbing tubing, sink grease trap, cooker lighter, two screws and a few plumbing connector parts and pipe weld glue. All this stuff was bought from B&Q. Also bought was tescos value hairspray (17p if I remember correctly) canned hotdogs also from tesco (we used some digital callipers to measure various brands for the best fit).
The only moderately tricky part here was the ignition system. In the pic below you can see how it comes together. Basically, wires where run from the inside of the electric cooker lighter and connected two the two screws seen here.

You can click on this image to see a bigger image.
This causes a spark to jump across the small gap whenever the trigger s pulled.
The rest of the construction is self evident looking at the gun. The main piece of advice I would add is to make sure the whole thing is air tight. The best way to do this is to blow into the business end of it and listen out for leaks. If you've got any bung them up with more gaffa and glue until theres no leaks at all. At this point your gona have one powerful sausage flinging stick of mayhem. See video bellow.
As to wether this thing is legal, I have no idea, so if you do build your own and subsequently get yourself arrested or shot, dont come crying to me.
Also I am waiting on Alex to send me some more pics of the gun (its in his loft I think.
Hope you like :)
Wednesday, 17 February 2010
My Adventures in EeePC Modding
This ones not actually that old.
A few years back there was a big buzz around Eee PC modding. I saw a lot of really cool looking stuff done to them so could'nt help myself and bought one of my own to play with.
I went pretty full on with my modifications. In the end I have the following mods.

1. Touch screen. Real easy this one. Theres plenty of info on the web about how its done so it was easy to follow. The only hard part was removing the anti-glare layer of the screen. Its a little bt scary.

2. XP nlite install. The original Eee came with a linux distro that would have made my mods a little more tricky for me to install. So I used a slimed down version of xp on it. On the software side I also added some modded lcd drivers and an overclocking app.
3. USB Hub. This was installed inside and connected to the free usb poins on the motherboard.

4. USB Memory stick (8GB). This has a bootable version of backtrack3 installed, to make my Eee dual bootable. The usb stick had a status led so I decided to add this to the Eee too. Its hard to explain this so easer to see on the pics.

5. Bluetooth. This was a bit tricky to get to work with nlite but it worked in the end. I also added a status led for this too.
6. Pig tail. I added this so that I could use a cantena for wifi sniffing. Easy to install.
7. iPod HD. This was a 30g modal that I had laying about. I bought a usb enclosure and stripped it down to fit. Bit of a tight fit but works great.

8. Stylus plus slot. This was easy but esentual. I used an NDS Stylus for this.

9. The status LED. You can make out in this pic. These where made with hot glue and hope. Worked out nice.

.
I was real happy with the way it turned out and still use it regularly.
PSP Rumble
Adding a rumble feature to a psp has been something I've toyed with on a few occasions. Heres a video that was featured on hackaday a while back.
From what Ive read theres a licence you have to pay in order to use a "forcefeedback" feature. Which is why its not present in most handhelds, and why sony where resistant to add it to they're ps3 controller.
I've been laying alot of psp recently and am starting to think it would be well worth resurrecting this mod. It was never that difficult I just never really got round to finishing it. Well I'am sticking it top of my list when I return to London.
Stay tuned for that one.
SonicBuddha's PSP
Heres another Modded PSP made a few years back. I dont have access to an photos of this one right now so heres some info and the video.
Cant locate any info on my old site acidmods for this ether. Oh well heres a link to the QJ article about it.
Wednesday, 10 February 2010
2 Mods 1 PSP
This is another old mod. I was way proud of this one but it never got much of a reaction. I have no idea whats happened to it ether. Checking my post abou it on acidmods I mentioned that it was on sale through coolmods (what ever happened to them?). Heres part of the write up from back when I finished it.
"What I did here is add 2 leds to each of the original led points, mem/power/wifi that can be switched between using the note key. The blue mode has a music lighting mod. I used a modified version of a headphone amp circuit for the pulsing, it works much better than any other circuit Ive used, the lights are very responsive (not that you can tell in the vid). The Red mode has solid lighting in the triggers an speakers. The colour switching is handled by a PIC microcontroller.
I am really happy with the way this came out. Hope you all dig it."
Heres the video of it. Havent been able to find any pics as yet though.
Tuesday, 9 February 2010
PSP with Matrix style PS2 add-on

Found a heap of pics while I was doing the post about the iPod mod so thought I should add a few more posts today.
This mod was a real labour of love, took me months to get it finished and I distroyed sevral psp's in the process.
What I did here was add 4 usb style conectors to a psp that conected directly to the controles. I then built a modded ps2 controler with a custom made dock conector.
The thing worked remarcably well and I wish I knew where it was. I may well build another one of these one day. I am sure I can impove on the disign.
Heres a video of the mod in action, youtube took off the music though :(
Here a whole load of pics I found of the build process.
Modded iPod with NES controller


Since I am currently laid up in bed due to a knee injury I thought it might be a good time to start adding updating this blog.
This is a mod I did three or more years ago now. I had played around with installing linux on my 4th gen iPod for a while and was looking to make it a bit more fun. My answer to this was to make it useable with a NES controller. It was actualy quite easy, just required some fine soldering.
The short story is that I tapped the face buttons to a mini usb type socket. I then modded a NES controller for direct button presses. The two where brought together with a dock type set up on the back of the NES con.
Heres a video of the working mod.
I have also finaly found the pics of the build so will update with a tutorial once I have a better web conection (currently on 3G, as I am living in the french alps an there aint alot of wifi in the air).
EDIT: Looks like my boys over at acidmods have found my tutorial heres the link.
Subscribe to:
Posts (Atom)

